Product Master Manual
Step 1: Log In with New Credentials
- After your organization is created, you'll receive an OTP via email. Enter the OTP to verify your account. You will then get your Admin ID and Password by email.
- Use these credentials to log in to the IMS Web POS system.
- Your 15-day free trial starts on your first login.
Step 2: Create a Product Category
What is a Product Category?
A Product Category is used to group similar types of products together (e.g., Grocery, Electronics, Stationery, Beverages).
It helps in better organization of items, simplifies reporting, and allows applying common rules (such as tax or margin) to a group of products.
Steps to Create a Product Category:
- Go to Master → Product Category
- Click "Add Category"
- Enter the Category Name (e.g., Grocery, Electronics, etc.)
- Click Save to complete the process
Note: You can later view, edit, or delete existing categories if needed.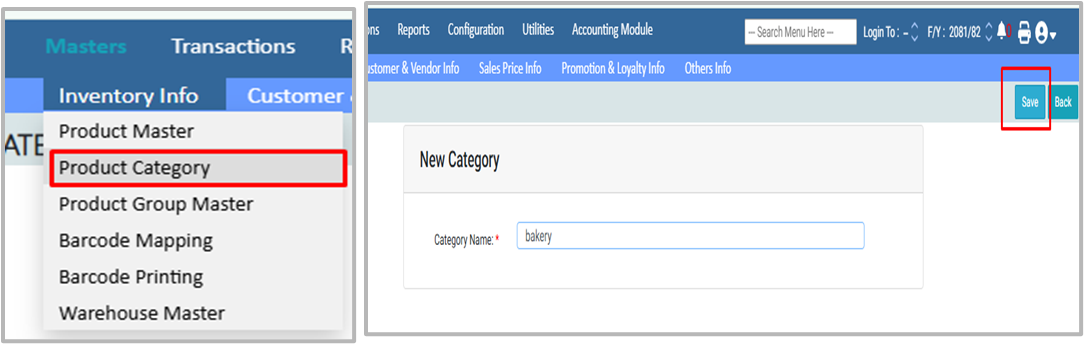
h2. Step 3: Create a Unit Master
What is a Unit Master?
A Unit Master defines the measurement units used for products (e.g., pieces, kilograms, liters). It ensures consistency when recording quantities, sales, and purchases.
Steps to Create a Unit Master:
- Navigate to Master → Other Info → Unit Master
- Click "Add Unit"
- Enter the Unit Name (e.g., pcs, kg, liter)
- Click Save to complete the setup
Note: You can always edit, view, or delete existing units later.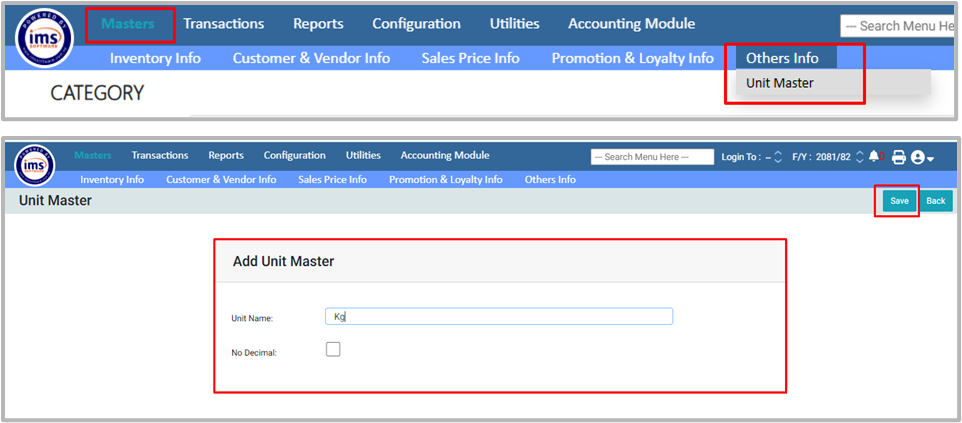
Step 4: Create a Product Item Group
What is a Product Item Group?
A Product Item Group organizes products into Main Groups (parents) and Sub Groups (children) for better reporting and margin control.
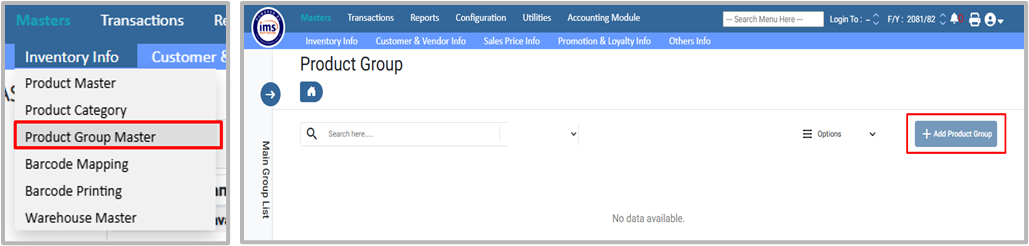
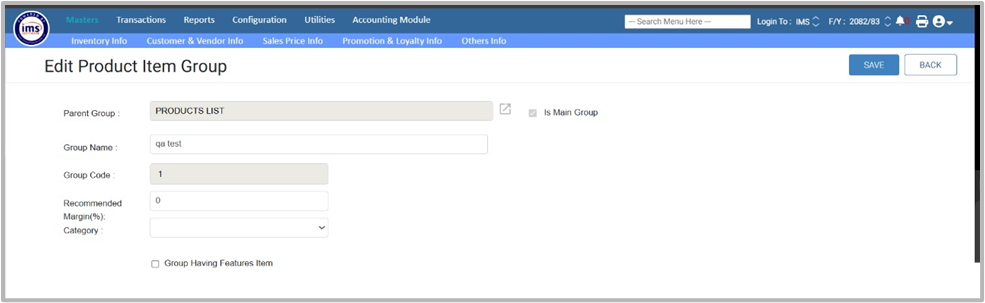
Steps to Add a Product Item Group:
- Go to Master → Product Item Group
- Click Add Product Group
- Select or create a Main Group (enable "Is Main Group" if it is a parent)
- Enter the Group Name
- Add the Recommended Margin
- Select the Category created earlier in Category Master
- Click Save
Example:
- Main Group: Grocery
- Sub Group: Rice → Product: Basmati Rice
Note:
- If "Is Main Group" is checked → it becomes a Parent Group
- If not → it will be a Sub Group under the selected parent
- Groups can later be viewed, edited, or deleted as needed
Step 5: Add a Product - Step-by-Step Process
After setting up Product Categories, Units, and Product Groups, you can now add a product to your system.
1. Go to:
Master → Inventory info → Product Master → Add Product → Add Product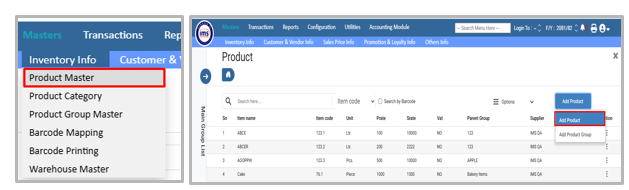
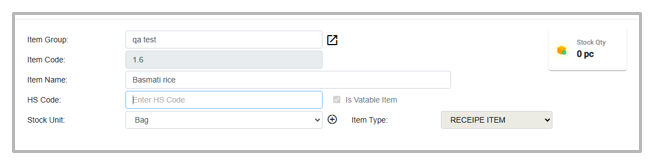
2. Select Item Group:
- Click Item Group dropdown and select the relevant group
- The Item Code will be generated automatically
3. Enter Item Name:
Type the product name (e.g., Basmati Rice).
4. Enter HS Code:
Input the Harmonized System code for tax/customs.
5. Select Stock Unit
- Choose the stock unit (e.g., pcs, kg, liter)
- If required, you can add a new unit via Unit Master
6. Select Item Type
Choose one type depending on how the product is used:
- Inventory Item - Stock items you sell
- Example: Basmati Rice
- Raw Item - Materials used to make other products
- Example: Wheat Flour, Sugar
- Service Item - Non-stock items representing services
- Example: Home Delivery, IMS software
- Example: Home Delivery, IMS software
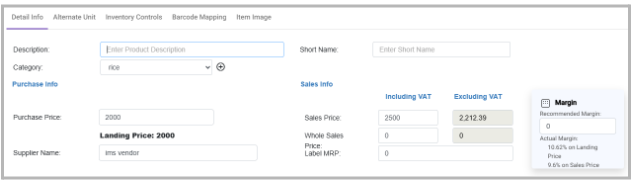
7. Fill Detail Info:
Detail Info
- Description: Write a short description of the product
- Example: "Premium quality long-grain basmati rice, 1kg pack"
- Short Name: Optional shorter name for quick reference
- Example: "Basmati 1kg"
- Item Category: Select from the list
- Example: Grocery
- Example: Grocery
Fill Purchase Info
- Purchase Price: Cost of the item from the supplier (e.g., NPR 120 per kg). Reflected in purchase transactions
- Supplier Name: Optional. If selected (e.g., Shree Traders Pvt. Ltd), it will show in purchase transactions when the same supplier is chosen
Fill Sales Info
- Enter Sales Price → Must be higher than the purchase price
- Example: If purchase price is NPR 100, enter sales price NPR 120
- The system will automatically calculate:
- Sales Price Including VAT → e.g., NPR 135.60 (if 13% VAT)
- Sales Price Excluding VAT → NPR 120
Optional Pricing Details
You can set additional pricing options for better sales and margin control.
- Wholesale Price → Enter the product's wholesale selling price
- Label MRP → Enter the Maximum Retail Price (MRP) to be printed on labels
- Recommended Margin → Set the expected margin percentage
- Example: 20%
- Actual Margin (Landing Price) → Automatically calculated by the system based on purchase (landing) price
- Formula: Actual Margin = ((Sales Price - Landing Price) / Sales Price) × 100
- Actual Margin (Sales Price) → Automatically calculated by the system based on sales price
- Formula: Actual Margin = ((Sales Price - Purchase Price) / Sales Price) × 100
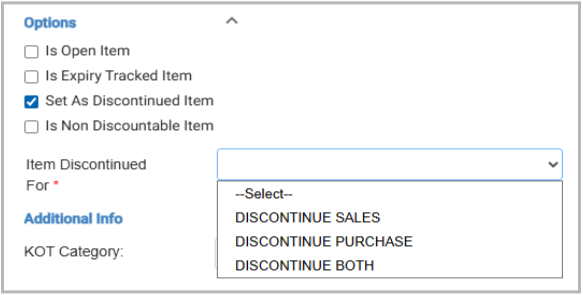
Tick Applicable Options
- Is Open Item
- When ticked, the product name can be edited or renamed during direct sales transactions. This is mainly used for service items, where the name or description may vary per transaction
- Is Expiry Tracked Item
- When ticked, you must enter both the Manufacturing Date (MFG Date) and Expiry Date during Purchase and Opening Stock transactions
Set as Discontinued Item
When ticked, the option "Item Discontinued For" appears with three choices:
- Discontinued Sales → If you select Discontinue Sales, the product will not appear in sales transactions
- (Used when the user only wants to purchase but not sell the product.)
- Discontinued Purchase → If you select Discontinue Purchase, the product will not appear in purchase transactions
- (Used when the user only wants to sell but not purchase the product.)
- Discontinued Both → If you select Discontinue Both, the product will not appear in any transactions
- (Used when the user wants to discontinue both sales and purchase of the product.)
- (Used when the user wants to discontinue both sales and purchase of the product.)
- Is Non-Discountable Item
- When ticked, the item cannot receive any discount in transactions. Example: Lottery Tickets, Government Fixed Price Medicines
- This ensures that no discount can be applied to these items in any transaction process
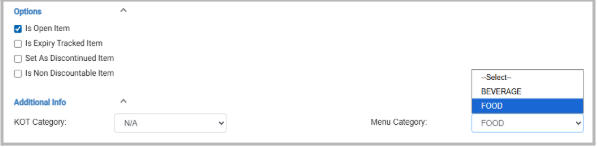
Additional Info (for Restaurant/Hotel Sector)
This section is used to define extra details required in restaurant or hotel operations.
- KOT Category → Choose how the item is handled in the Kitchen Order Ticket (KOT)
- KOT → Item is sent to the kitchen printer
- BOT → Item is sent to the bar printer
- N/A → Not applicable (item does not require KOT/BOT)
- Menu Type → Select the type of item for menu classification
- Examples: Food, Beverages, Snacks, Desserts
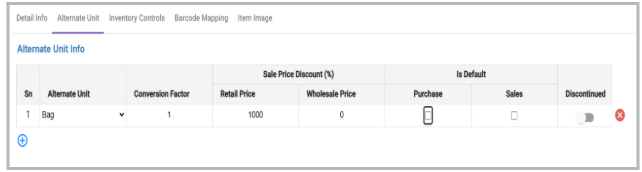
8. Alternate Unit Info (if required):
Purpose:
Allows a product created in one unit to be transacted in another unit, based on the setup.
Steps:
- Click Alternate Unit
- Select Unit → Choose an existing unit from Unit Master
- Enter Conversion Factor → Define how many stock units = 1 alternate unit
- Example: If 1 kg Basmati Rice = Rs. 200, then 1 Bora (25 kg) = Rs. 5000
- Enter Sale Price Discount % (optional) → Discount applies when sold in alternate units
- Example: 5% discount when sold in Bora
- Set Usage:
- Purchase → Alternate unit is applied in purchase transactions
- Sales → Alternate unit is applied in sales transactions
- Both → Alternate units are applied in both purchase and sales transactions
- Keep Enable Toggle inactive to apply the alternate unit info
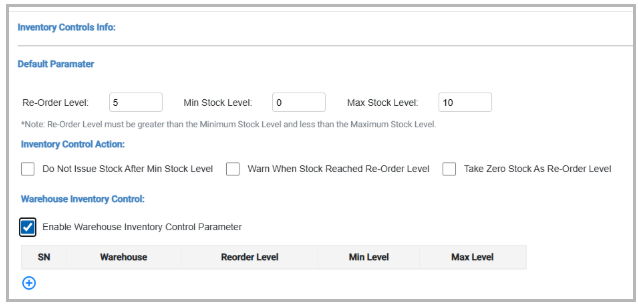
9. Inventory Control Info (if required):
Purpose:
Manage stock levels to prevent shortages or overstock.
Steps:
- Go to the Inventory Control Info section
- Enter:
- Re-Order Level: Stock at which to reorder (e.g., 100 kg Basmati Rice)
- Minimum Stock Level: Lowest allowed stock (≤ Re-Order Level, e.g., 50 kg)
- Maximum Stock Level: Maximum stock to store (e.g., 1000 kg)
- Tick options as needed:
- Do Not Issue Stock After Min Stock Level → Stops selling below min stock
- Warn When Stock Reached Re-Order Level → Alert for reorder
- Take Zero Stock As Re-Order Level → Treat zero stock as reorder trigger
- Warehouse Control:
- Enable Warehouse Inventory Control Parameter
- Enter Warehouse Name, Re-Order Level, Min Stock, Max Stock for each warehouse
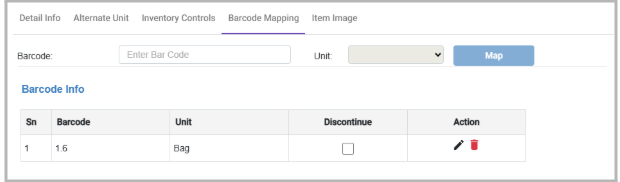
10. Barcode Mapping (if required):
Purpose:
Assign a barcode to a product for easy scanning and tracking.
Steps:
- Select Barcode Mapping
- Enter Barcode Number
- Example: 8901234567890
- Select Product Unit → e.g., 1 kg Basmati Rice
- The system maps the barcode and shows a pop-up with the previous item code and the new barcode
- Duplicate barcode entry → Triggers an error pop-up
- Optional: Tick to Discontinue barcode or use Edit/Delete to modify it
Additional Notes:
- You can also map a barcode from Inventory Info → Barcode Mapping
- Once mapped, the product can be quickly found in the Transaction section using the barcode
11. Batchwise Price Log (Product Master)
In Product Master, there is a feature called Batchwise Price Log where the user can view product details batch-wise, including:
- Batch Number → Unique ID for each batch
- Stock Quantity → Quantity available in that batch
- Sell Rate Before Tax → Retail & Wholesale price
- MRP → Maximum Retail Price
- Expiry Date → Expiry of the batch (if applicable)

12. Click Save to Complete
Click Save to complete, and the product is now ready for transactions.
Note: You can always edit, view, or delete existing products later.