|
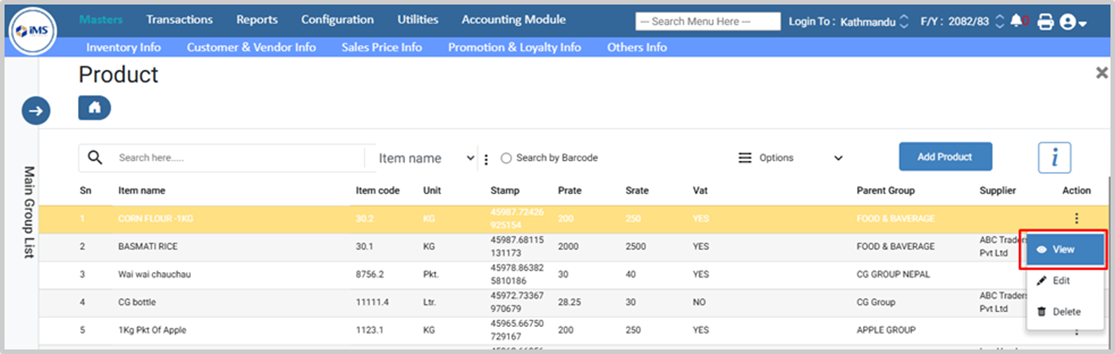
clipboard-202601041241-e1fpb.png (231 KB)
clipboard-202601041241-e1fpb.png |
|
Sujata Khatri, 01/04/2026 06:56 AM
|
|
|
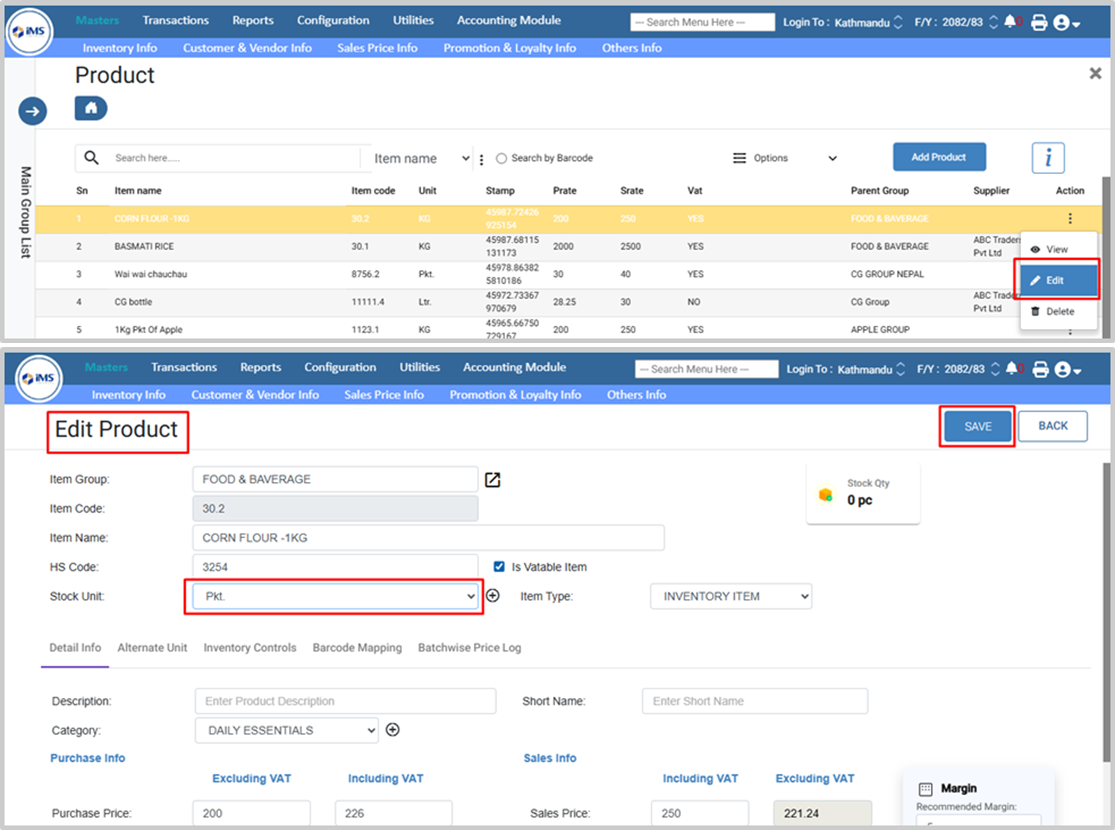
clipboard-202601041241-uatri.png (303 KB)
clipboard-202601041241-uatri.png |
|
Sujata Khatri, 01/04/2026 06:56 AM
|
|
|
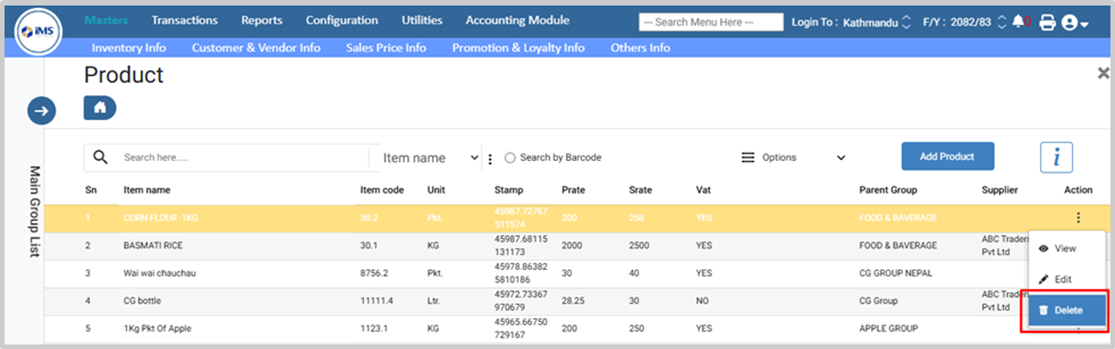
clipboard-202601041241-gkibj.png (250 KB)
clipboard-202601041241-gkibj.png |
|
Sujata Khatri, 01/04/2026 06:57 AM
|
|
|
clipboard-202601041242-j7b78.png (151 KB)
clipboard-202601041242-j7b78.png |
|
Sujata Khatri, 01/04/2026 06:57 AM
|
|
|
clipboard-202601041242-rzwdd.png (117 KB)
clipboard-202601041242-rzwdd.png |
|
Sujata Khatri, 01/04/2026 06:57 AM
|
|
|
clipboard-202601041242-dxbtr.png (106 KB)
clipboard-202601041242-dxbtr.png |
|
Sujata Khatri, 01/04/2026 06:57 AM
|
|
|
clipboard-202601041242-hweli.png (129 KB)
clipboard-202601041242-hweli.png |
|
Sujata Khatri, 01/04/2026 06:57 AM
|
|
|
clipboard-202601041243-crwxf.png (70.3 KB)
clipboard-202601041243-crwxf.png |
|
Sujata Khatri, 01/04/2026 06:58 AM
|
|
|
clipboard-202601041243-2lbvn.png (67.5 KB)
clipboard-202601041243-2lbvn.png |
|
Sujata Khatri, 01/04/2026 06:58 AM
|
|
|
clipboard-202601041243-l9rbu.png (62.8 KB)
clipboard-202601041243-l9rbu.png |
|
Sujata Khatri, 01/04/2026 06:58 AM
|
|
|
clipboard-202601041244-sotmk.png (44.2 KB)
clipboard-202601041244-sotmk.png |
|
Sujata Khatri, 01/04/2026 06:59 AM
|
|
|
clipboard-202601041244-8mfid.png (46.2 KB)
clipboard-202601041244-8mfid.png |
|
Sujata Khatri, 01/04/2026 06:59 AM
|
|
|
clipboard-202601041244-g37h1.png (142 KB)
clipboard-202601041244-g37h1.png |
|
Sujata Khatri, 01/04/2026 06:59 AM
|
|
|
clipboard-202601041245-2kkgc.png (129 KB)
clipboard-202601041245-2kkgc.png |
|
Sujata Khatri, 01/04/2026 07:00 AM
|
|
|
clipboard-202601041245-xjfvg.png (80.2 KB)
clipboard-202601041245-xjfvg.png |
|
Sujata Khatri, 01/04/2026 07:00 AM
|
|
|
clipboard-202601041247-k5oq6.png (70.9 KB)
clipboard-202601041247-k5oq6.png |
|
Sujata Khatri, 01/04/2026 07:02 AM
|
|
|
clipboard-202601041247-cwnub.png (103 KB)
clipboard-202601041247-cwnub.png |
|
Sujata Khatri, 01/04/2026 07:02 AM
|
|
|
clipboard-202601041247-0g6hb.png (66.7 KB)
clipboard-202601041247-0g6hb.png |
|
Sujata Khatri, 01/04/2026 07:02 AM
|
|
|
clipboard-202601041247-kmfim.png (87.7 KB)
clipboard-202601041247-kmfim.png |
|
Sujata Khatri, 01/04/2026 07:02 AM
|
|
|
clipboard-202601041247-lbjle.png (168 KB)
clipboard-202601041247-lbjle.png |
|
Sujata Khatri, 01/04/2026 07:02 AM
|
|
|
clipboard-202601041248-0itld.png (130 KB)
clipboard-202601041248-0itld.png |
|
Sujata Khatri, 01/04/2026 07:03 AM
|
|
|
clipboard-202601041248-plyqd.png (123 KB)
clipboard-202601041248-plyqd.png |
|
Sujata Khatri, 01/04/2026 07:03 AM
|
|
|
clipboard-202601041248-hnh8z.png (266 KB)
clipboard-202601041248-hnh8z.png |
|
Sujata Khatri, 01/04/2026 07:03 AM
|
|
|
clipboard-202601041248-wum5s.png (122 KB)
clipboard-202601041248-wum5s.png |
|
Sujata Khatri, 01/04/2026 07:03 AM
|
|
|
clipboard-202601041248-6h3kv.png (240 KB)
clipboard-202601041248-6h3kv.png |
|
Sujata Khatri, 01/04/2026 07:03 AM
|
|