|
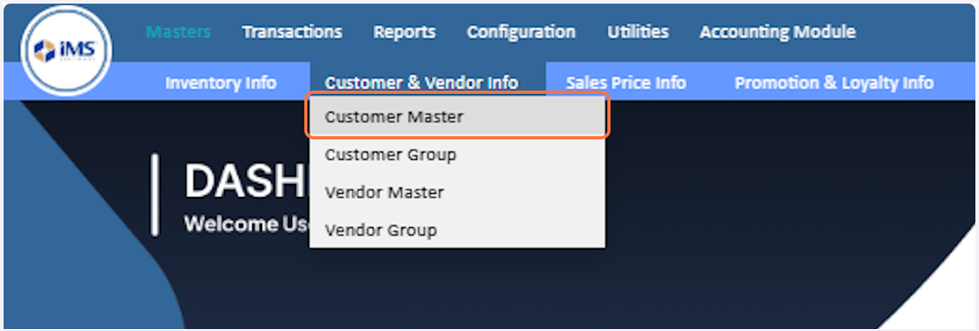
clipboard-202601051243-0m6sg.png (88.8 KB)
clipboard-202601051243-0m6sg.png |
|
Sujata Khatri, 01/05/2026 06:58 AM
|
|
|
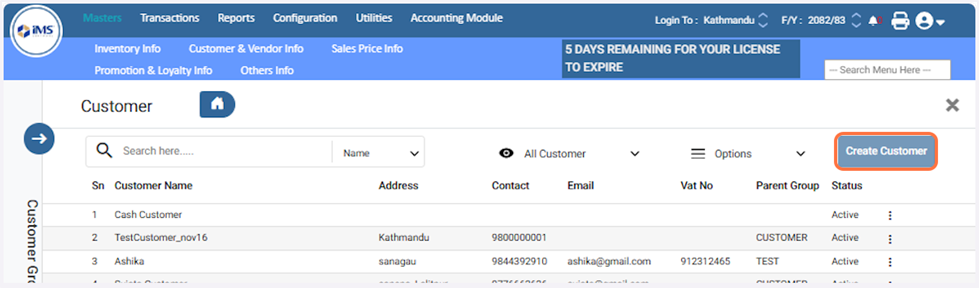
clipboard-202601051243-72mui.png (194 KB)
clipboard-202601051243-72mui.png |
|
Sujata Khatri, 01/05/2026 06:58 AM
|
|
|
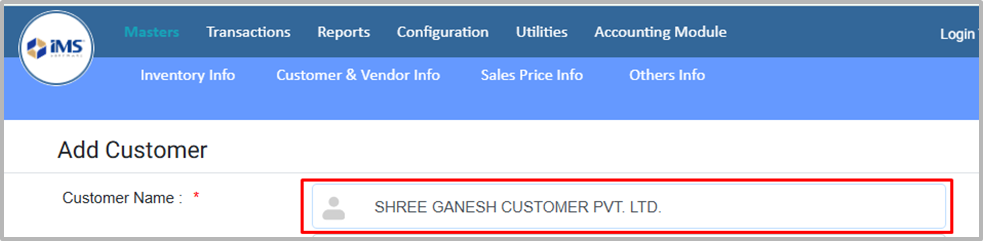
clipboard-202601051243-vtmoz.png (174 KB)
clipboard-202601051243-vtmoz.png |
|
Sujata Khatri, 01/05/2026 06:58 AM
|
|
|
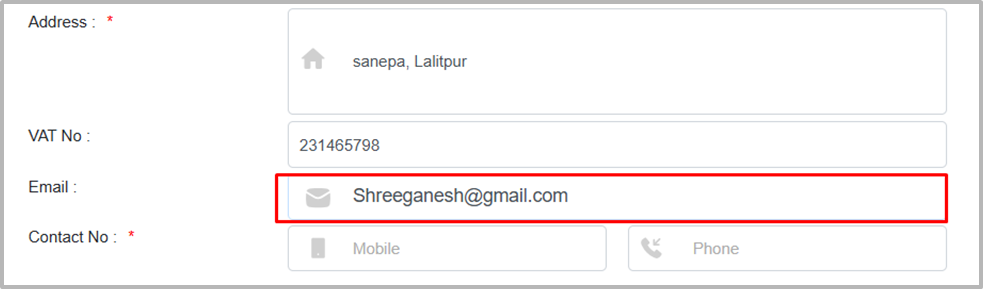
clipboard-202601051243-ngfew.png (113 KB)
clipboard-202601051243-ngfew.png |
|
Sujata Khatri, 01/05/2026 06:58 AM
|
|
|
clipboard-202601051243-hirb8.png (56.7 KB)
clipboard-202601051243-hirb8.png |
|
Sujata Khatri, 01/05/2026 06:58 AM
|
|
|
clipboard-202601051244-hvy2r.png (9.21 KB)
clipboard-202601051244-hvy2r.png |
|
Sujata Khatri, 01/05/2026 06:59 AM
|
|
|
clipboard-202601051244-nmzce.png (22.4 KB)
clipboard-202601051244-nmzce.png |
|
Sujata Khatri, 01/05/2026 06:59 AM
|
|
|
clipboard-202601051244-sbxr8.png (34.6 KB)
clipboard-202601051244-sbxr8.png |
|
Sujata Khatri, 01/05/2026 06:59 AM
|
|
|
clipboard-202601051244-tlcdi.png (42.1 KB)
clipboard-202601051244-tlcdi.png |
|
Sujata Khatri, 01/05/2026 06:59 AM
|
|
|
clipboard-202601051244-44kpe.png (19.7 KB)
clipboard-202601051244-44kpe.png |
|
Sujata Khatri, 01/05/2026 06:59 AM
|
|
|
clipboard-202601051245-1q6td.png (80.8 KB)
clipboard-202601051245-1q6td.png |
|
Sujata Khatri, 01/05/2026 07:00 AM
|
|
|
clipboard-202601051245-abxvv.png (23.4 KB)
clipboard-202601051245-abxvv.png |
|
Sujata Khatri, 01/05/2026 07:00 AM
|
|
|
clipboard-202601051245-as00j.png (38.3 KB)
clipboard-202601051245-as00j.png |
|
Sujata Khatri, 01/05/2026 07:00 AM
|
|
|
clipboard-202601051245-1dbza.png (83.1 KB)
clipboard-202601051245-1dbza.png |
|
Sujata Khatri, 01/05/2026 07:00 AM
|
|
|
clipboard-202601051245-gjodw.png (49.2 KB)
clipboard-202601051245-gjodw.png |
|
Sujata Khatri, 01/05/2026 07:00 AM
|
|
|
clipboard-202601051245-hqtjs.png (76.4 KB)
clipboard-202601051245-hqtjs.png |
|
Sujata Khatri, 01/05/2026 07:00 AM
|
|
|
clipboard-202601051246-b32a8.png (26.2 KB)
clipboard-202601051246-b32a8.png |
|
Sujata Khatri, 01/05/2026 07:01 AM
|
|
|
clipboard-202601051246-oqeau.png (39.7 KB)
clipboard-202601051246-oqeau.png |
|
Sujata Khatri, 01/05/2026 07:01 AM
|
|
|
clipboard-202601051246-raqnk.png (60.3 KB)
clipboard-202601051246-raqnk.png |
|
Sujata Khatri, 01/05/2026 07:01 AM
|
|
|
clipboard-202601051246-bhafs.png (72.5 KB)
clipboard-202601051246-bhafs.png |
|
Sujata Khatri, 01/05/2026 07:01 AM
|
|
|
clipboard-202601051246-1etim.png (62.7 KB)
clipboard-202601051246-1etim.png |
|
Sujata Khatri, 01/05/2026 07:01 AM
|
|
|
clipboard-202601051247-eauxq.png (22.8 KB)
clipboard-202601051247-eauxq.png |
|
Sujata Khatri, 01/05/2026 07:02 AM
|
|
|
clipboard-202601051247-vtoeg.png (15.6 KB)
clipboard-202601051247-vtoeg.png |
|
Sujata Khatri, 01/05/2026 07:02 AM
|
|
|
clipboard-202601051247-ktt2v.png (76.6 KB)
clipboard-202601051247-ktt2v.png |
|
Sujata Khatri, 01/05/2026 07:02 AM
|
|
|
clipboard-202601051247-qdcmd.png (28.5 KB)
clipboard-202601051247-qdcmd.png |
|
Sujata Khatri, 01/05/2026 07:02 AM
|
|
|
clipboard-202601051247-llqjj.png (77.2 KB)
clipboard-202601051247-llqjj.png |
|
Sujata Khatri, 01/05/2026 07:02 AM
|
|
|
clipboard-202601051247-cfykt.png (65.1 KB)
clipboard-202601051247-cfykt.png |
|
Sujata Khatri, 01/05/2026 07:02 AM
|
|
|
clipboard-202601051248-o6ti6.png (47.6 KB)
clipboard-202601051248-o6ti6.png |
|
Sujata Khatri, 01/05/2026 07:03 AM
|
|
|
clipboard-202601051248-w94se.png (40.3 KB)
clipboard-202601051248-w94se.png |
|
Sujata Khatri, 01/05/2026 07:03 AM
|
|
|
clipboard-202601051248-rgo3e.png (49.2 KB)
clipboard-202601051248-rgo3e.png |
|
Sujata Khatri, 01/05/2026 07:03 AM
|
|