|
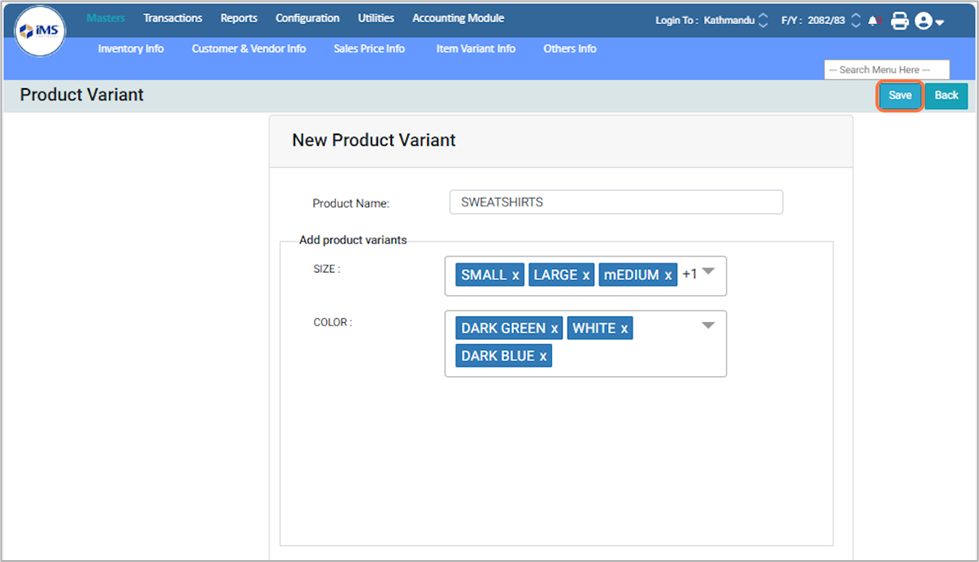
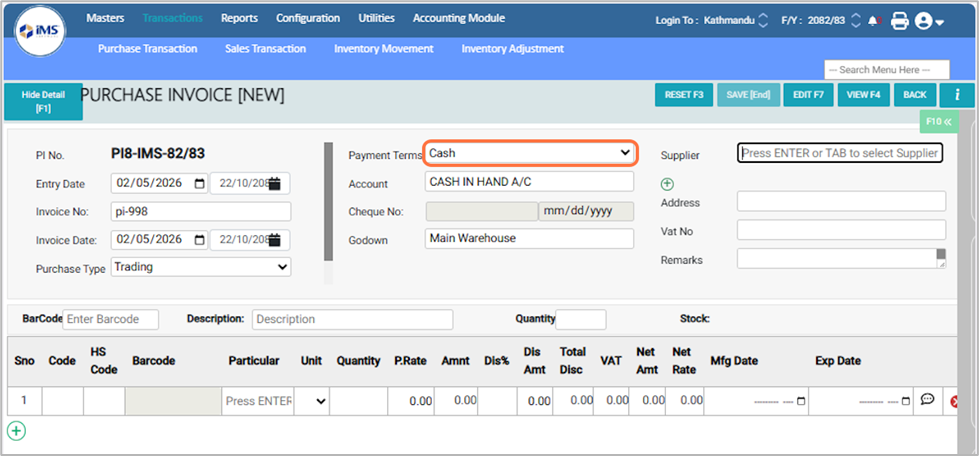
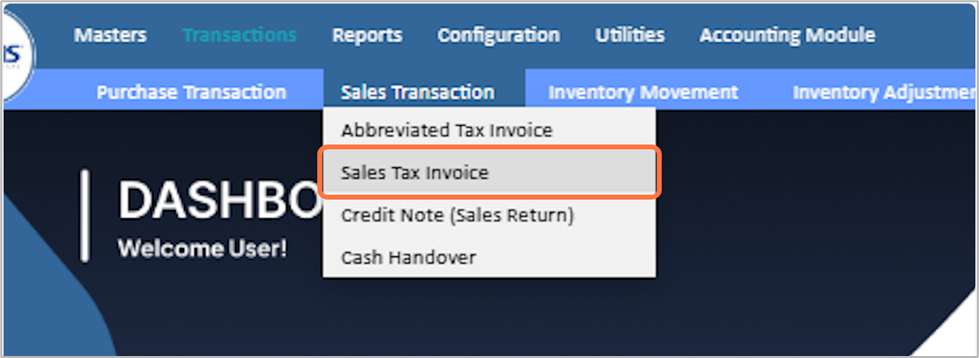
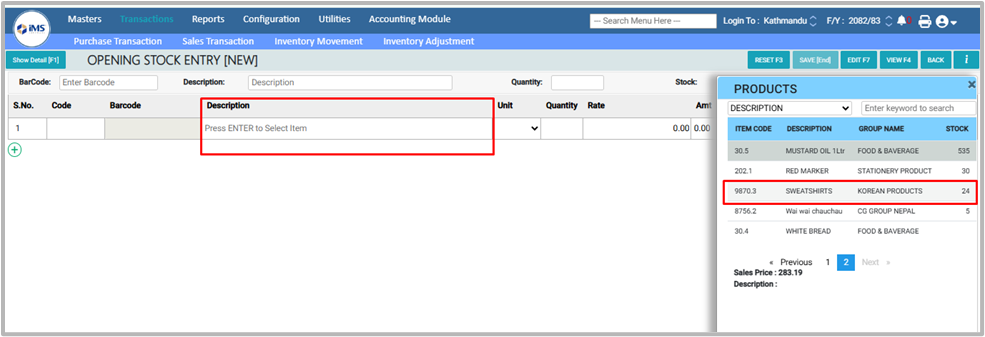
clipboard-202605291613-zwyac.png (191 KB)
clipboard-202605291613-zwyac.png |
|
Sujata Khatri, 05/29/2026 10:28 AM
|
|
|
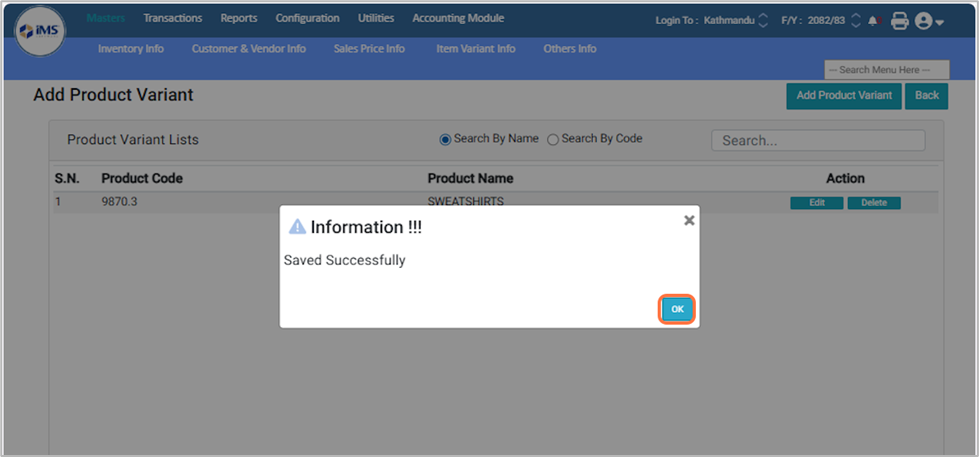
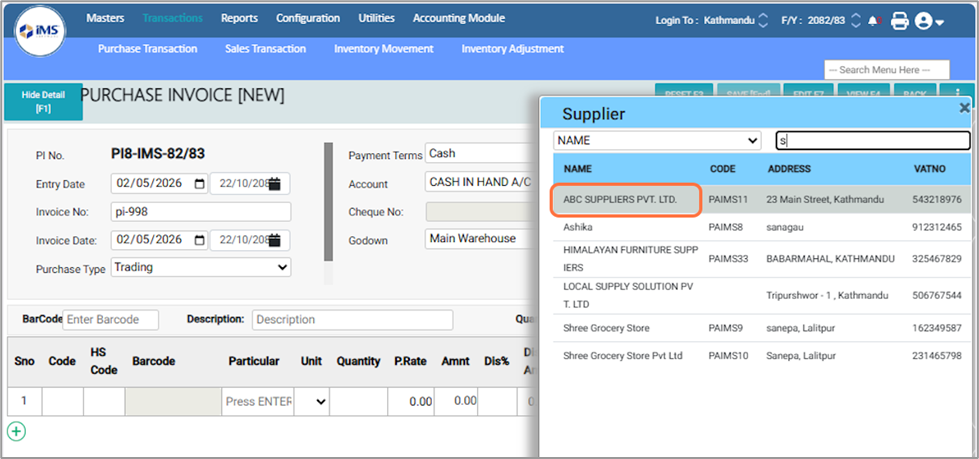
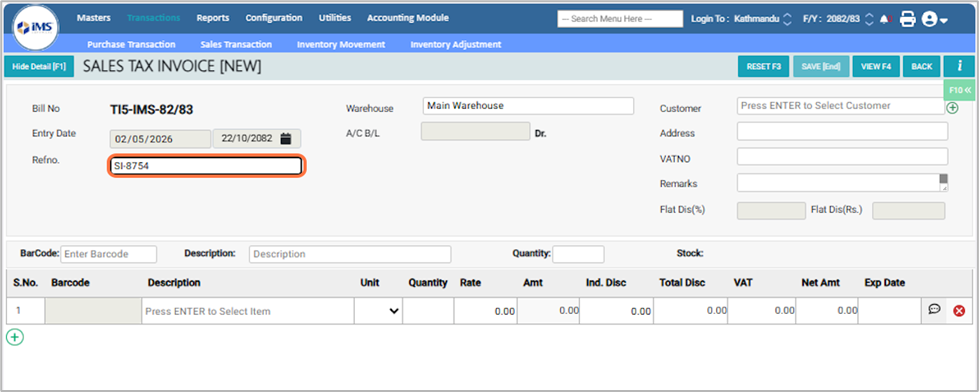
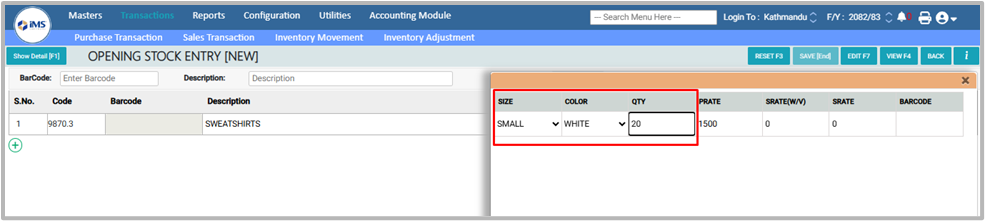
clipboard-202605291614-lo2v2.png (65.6 KB)
clipboard-202605291614-lo2v2.png |
|
Sujata Khatri, 05/29/2026 10:29 AM
|
|
|
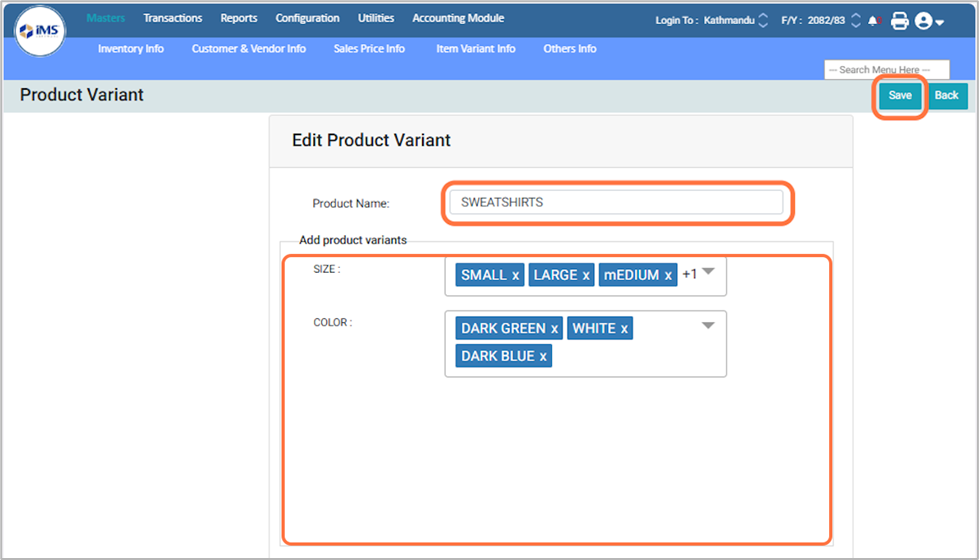
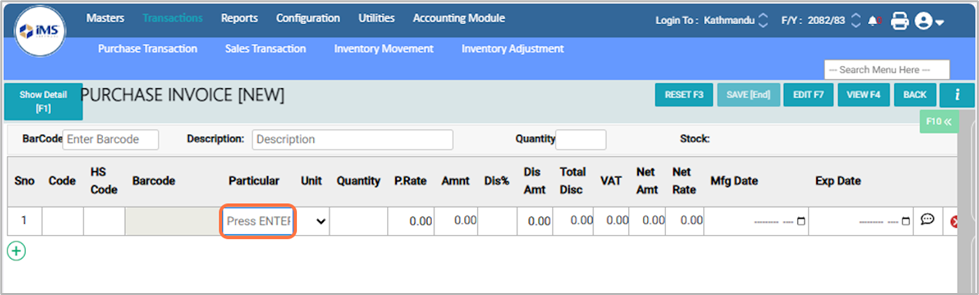
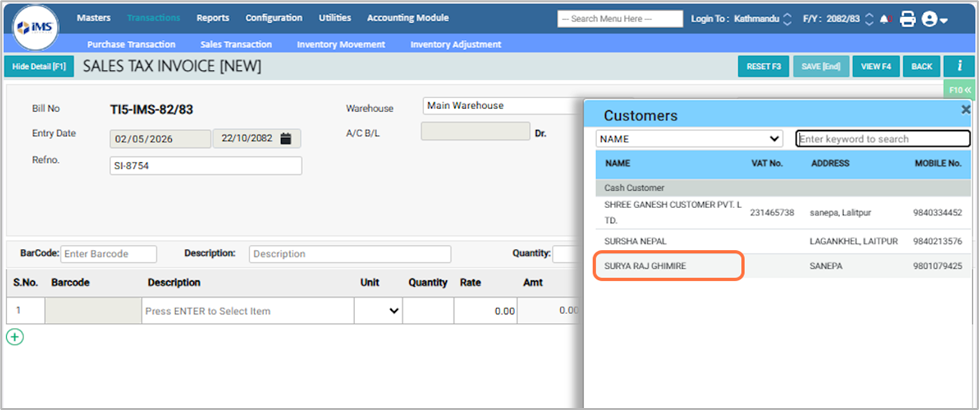
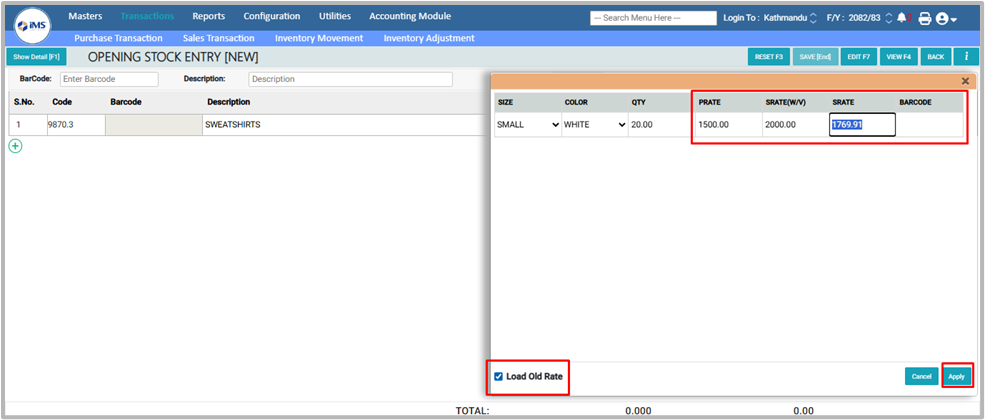
clipboard-202605291614-i18lx.png (112 KB)
clipboard-202605291614-i18lx.png |
|
Sujata Khatri, 05/29/2026 10:29 AM
|
|
|
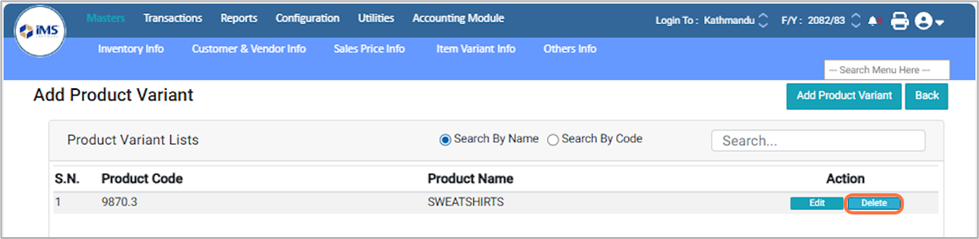
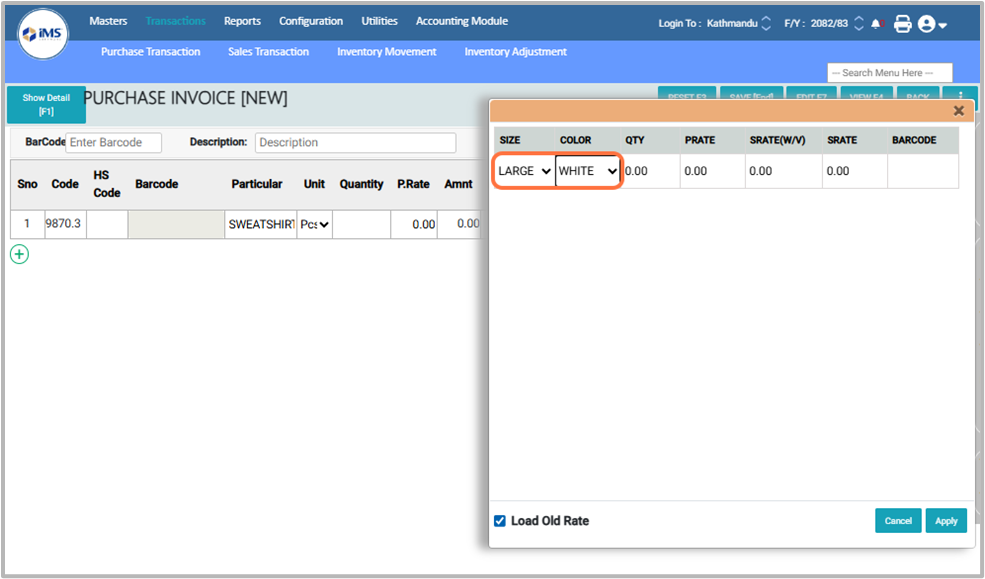
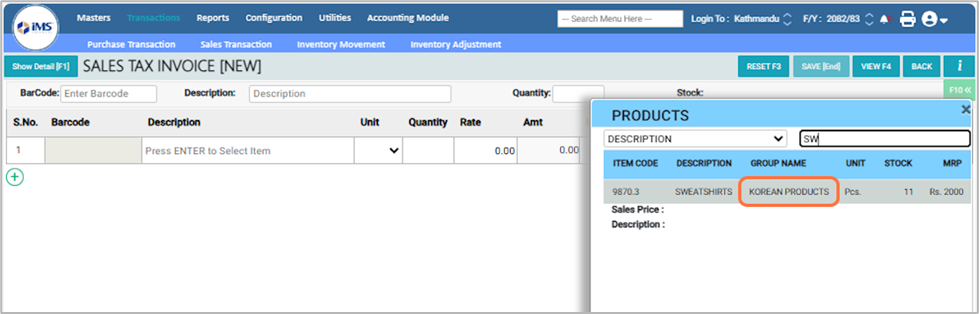
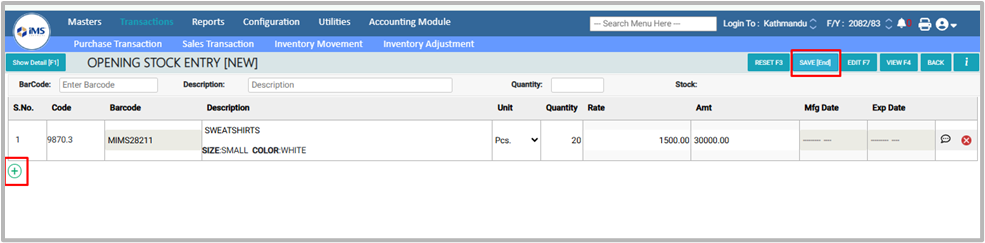
clipboard-202605291614-88wzx.png (98.4 KB)
clipboard-202605291614-88wzx.png |
|
Sujata Khatri, 05/29/2026 10:29 AM
|
|
|
clipboard-202605291614-emrmw.png (82.1 KB)
clipboard-202605291614-emrmw.png |
|
Sujata Khatri, 05/29/2026 10:29 AM
|
|
|
clipboard-202605291615-gbdga.png (89.8 KB)
clipboard-202605291615-gbdga.png |
|
Sujata Khatri, 05/29/2026 10:30 AM
|
|
|
clipboard-202605291615-zsirt.png (88.7 KB)
clipboard-202605291615-zsirt.png |
|
Sujata Khatri, 05/29/2026 10:30 AM
|
|
|
clipboard-202605291615-vcjno.png (83.2 KB)
clipboard-202605291615-vcjno.png |
|
Sujata Khatri, 05/29/2026 10:30 AM
|
|
|
clipboard-202605291615-n9nhz.png (77.4 KB)
clipboard-202605291615-n9nhz.png |
|
Sujata Khatri, 05/29/2026 10:30 AM
|
|
|
clipboard-202605291615-x3re8.png (91.7 KB)
clipboard-202605291615-x3re8.png |
|
Sujata Khatri, 05/29/2026 10:30 AM
|
|
|
clipboard-202605291616-d0y5d.png (76.7 KB)
clipboard-202605291616-d0y5d.png |
|
Sujata Khatri, 05/29/2026 10:31 AM
|
|
|
clipboard-202605291616-zibf9.png (77.1 KB)
clipboard-202605291616-zibf9.png |
|
Sujata Khatri, 05/29/2026 10:31 AM
|
|
|
clipboard-202605291616-vgcpa.png (180 KB)
clipboard-202605291616-vgcpa.png |
|
Sujata Khatri, 05/29/2026 10:31 AM
|
|
|
clipboard-202605291616-ipslm.png (178 KB)
clipboard-202605291616-ipslm.png |
|
Sujata Khatri, 05/29/2026 10:31 AM
|
|
|
clipboard-202605291617-po6cr.png (113 KB)
clipboard-202605291617-po6cr.png |
|
Sujata Khatri, 05/29/2026 10:32 AM
|
|
|
clipboard-202605291617-xiwz1.png (163 KB)
clipboard-202605291617-xiwz1.png |
|
Sujata Khatri, 05/29/2026 10:32 AM
|
|
|
clipboard-202605291617-5hsoz.png (177 KB)
clipboard-202605291617-5hsoz.png |
|
Sujata Khatri, 05/29/2026 10:32 AM
|
|
|
clipboard-202605291617-gcskv.png (107 KB)
clipboard-202605291617-gcskv.png |
|
Sujata Khatri, 05/29/2026 10:32 AM
|
|
|
clipboard-202605291617-t8ppb.png (142 KB)
clipboard-202605291617-t8ppb.png |
|
Sujata Khatri, 05/29/2026 10:32 AM
|
|
|
clipboard-202605291617-ydorj.png (99.4 KB)
clipboard-202605291617-ydorj.png |
|
Sujata Khatri, 05/29/2026 10:32 AM
|
|
|
clipboard-202605291618-ownzv.png (85.4 KB)
clipboard-202605291618-ownzv.png |
|
Sujata Khatri, 05/29/2026 10:33 AM
|
|
|
clipboard-202605291618-fzooh.png (83.2 KB)
clipboard-202605291618-fzooh.png |
|
Sujata Khatri, 05/29/2026 10:33 AM
|
|
|
clipboard-202605291618-fjrlp.png (101 KB)
clipboard-202605291618-fjrlp.png |
|
Sujata Khatri, 05/29/2026 10:33 AM
|
|
|
clipboard-202605291618-fz8dt.png (101 KB)
clipboard-202605291618-fz8dt.png |
|
Sujata Khatri, 05/29/2026 10:33 AM
|
|
|
clipboard-202605291619-qutwg.png (170 KB)
clipboard-202605291619-qutwg.png |
|
Sujata Khatri, 05/29/2026 10:34 AM
|
|
|
clipboard-202605291619-bcyum.png (115 KB)
clipboard-202605291619-bcyum.png |
|
Sujata Khatri, 05/29/2026 10:34 AM
|
|
|
clipboard-202605291619-xcwla.png (121 KB)
clipboard-202605291619-xcwla.png |
|
Sujata Khatri, 05/29/2026 10:34 AM
|
|
|
clipboard-202605291619-boucw.png (98 KB)
clipboard-202605291619-boucw.png |
|
Sujata Khatri, 05/29/2026 10:34 AM
|
|
|
clipboard-202605291619-vbndv.png (58.3 KB)
clipboard-202605291619-vbndv.png |
|
Sujata Khatri, 05/29/2026 10:34 AM
|
|
|
clipboard-202605291619-sqm4x.png (90.6 KB)
clipboard-202605291619-sqm4x.png |
|
Sujata Khatri, 05/29/2026 10:34 AM
|
|
|
clipboard-202605291620-imotc.png (93.4 KB)
clipboard-202605291620-imotc.png |
|
Sujata Khatri, 05/29/2026 10:35 AM
|
|
|
clipboard-202605291620-t5fv2.png (116 KB)
clipboard-202605291620-t5fv2.png |
|
Sujata Khatri, 05/29/2026 10:35 AM
|
|
|
clipboard-202605291620-daac3.png (80.7 KB)
clipboard-202605291620-daac3.png |
|
Sujata Khatri, 05/29/2026 10:35 AM
|
|
|
clipboard-202605291620-zyyip.png (56.7 KB)
clipboard-202605291620-zyyip.png |
|
Sujata Khatri, 05/29/2026 10:35 AM
|
|
|
clipboard-202605291620-b0ndf.png (67.7 KB)
clipboard-202605291620-b0ndf.png |
|
Sujata Khatri, 05/29/2026 10:35 AM
|
|
|
clipboard-202605291620-x3l0s.png (63.4 KB)
clipboard-202605291620-x3l0s.png |
|
Sujata Khatri, 05/29/2026 10:35 AM
|
|
|
clipboard-202605291621-lqeit.png (102 KB)
clipboard-202605291621-lqeit.png |
|
Sujata Khatri, 05/29/2026 10:36 AM
|
|
|
clipboard-202605291621-duogt.png (119 KB)
clipboard-202605291621-duogt.png |
|
Sujata Khatri, 05/29/2026 10:36 AM
|
|
|
clipboard-202605291621-hujtr.png (84.8 KB)
clipboard-202605291621-hujtr.png |
|
Sujata Khatri, 05/29/2026 10:36 AM
|
|