Membership Type Master
User documentation
07/24/2025
Membership Type Master
Requirement OverviewThe Membership Type Master is essential for creating and managing different types of memberships within the system. This functionality will allow administrators to define various membership levels, each with distinct durations.
Database Setting
- Introduce the table membershipTypeMaster which save the members information that include following table :
- memTypeID
- TypeCode
- Membership Type
- memCatId
- memSubCatID
- Validity_Mos
- BillingMode_Flg
- BillingMode_Desc
- MCODE
- PrepaidAmt
- IsAdvanceRequired
- IsActive
- memtypUID
- EntryUser
- EntryTimeStamp
- EntryDivision
- PhiscalID
- Introduce the table membershipCategoryMaster which save the members category information that include following table :
- memCatId
- CategoryCode
- CategoryName
- memCatUID
- Introduce the table membershipSubCategoryMaster which save the members sub category information that include following table :
- memSubCatId
- SubCategoryCode
- SubCategoryName
- memSubCatUID
UI Design
https://www.figma.com/design/mlN1fhTqjOiJp9nR6LuWGr/Tranquility-not-final?node-id=0-1&t=5bydBjHmBMSwDq9m-1
Functional Requirement
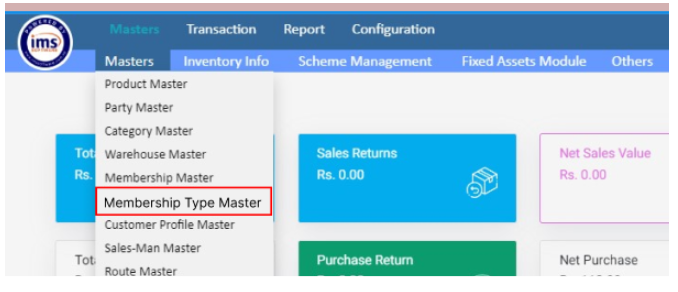
Requirement 1 : Create Membership Type Master under Masters >>Masters.
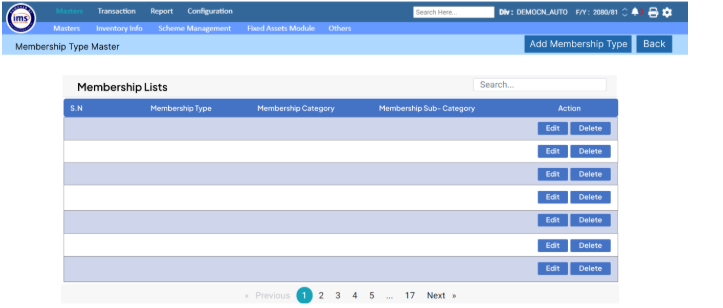
- All the membership types that have been created till today should be displayed.
Requirement 3 : When the user clicks on "Membership Type Master," the following UI should be displayed where the UI Details are as follows :
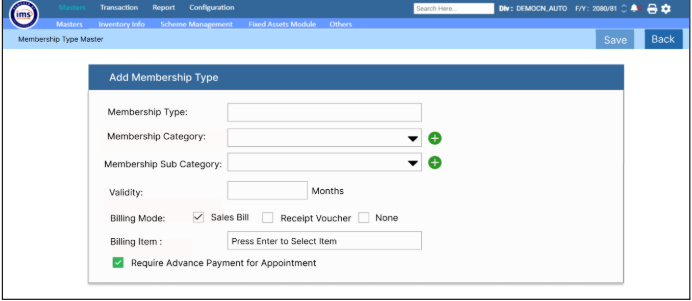
- Membership Type : Users can manually enter membership type in this fieldFor example : Indoor Premium Membership (Individual) - 6 months .It is mandatory field.

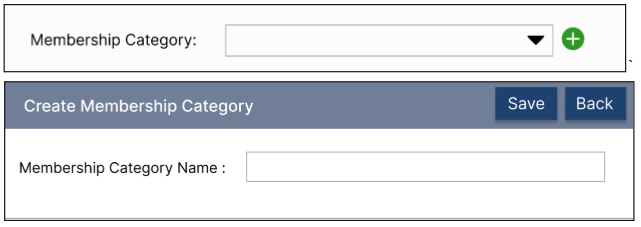
- Membership Category : It is a classification that defines different types or levels of membership (e.g. Premium Membership ); Users can add a new category using the "+" button or select an existing category from a dropdown.When User Click on Add button then Create Membership Category should pop up.The system should validate and reject any attempts to enter duplicate records.`
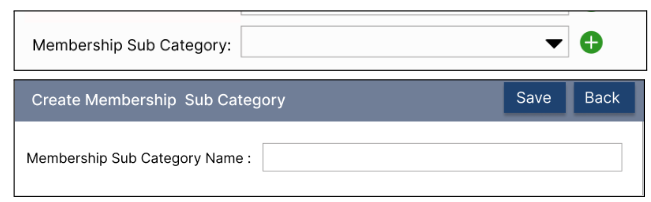
- Membership Sub Category : It is a classification that defines the different level of membership category (e.g. Indoor Premium Membership). Users can add a new category using the "+" button or select an existing category from a dropdown.When User Click on Add button then Create Membership Category should be pop up.The system should validate and reject any attempts to enter duplicate records.
Note: Membership type is mandatory, while membership category and subcategory are optional .
- Validity : The system should allow users to enter the membership duration as a number only, representing the number of months. This is a mandatory field and cannot accept a value of 0.

- Billing Mode : There are three checkboxes in billing mode.

- Sales Bill : It should be set as the default in the user interface (UI). When the user checks the Sales Bill option, the system should allow them to enter Billing item . When the user press Enter to select an item, an Item Selection box should pop up. The data in the Item Selection box should come from the Item Master. It only supports single item selection.

- Receipt Voucher : When the user checks the Receipt Voucher option, a Prepaid Amount box should appear. The system should allow users to enter an amount manually .

- * None :* When the user selects the "None" option, the system should ensure that neither the billing item entry nor the prepaid amount field appears.
None = 0
Sales Bill = 1
Receipt Voucher = 2
- Require Advance Payment for Appointment : By default, the "Require Advance for Appointment" option will be set as checked.
- If the user does not check the "Require Advance Payment for Appointment" option, there will be no validation or requirement for advance payment when registering an appointment.
- If the user selects the "Require Advance Payment for Appointment" option, the system must ensure that advance payment is required when registering for an appointment.
- The data should be stored in the table membershipTypeMaster.
Requirement 5 : Create an Excel upload template for the Membership Type Master, under the Master Migration and also provide a sample file.
Excel Sample File
https://docs.google.com/spreadsheets/d/1ieLlycuEd4w4Z9JNcCD54Vm1YwZe-uETQZ5ZXzhvkdY/edit?usp=sharing
Application flow
Step 1:
Go to the Masters section and navigate to "Membership Type Master."Click on Add Membership Type Button .
Step 2:
Manually enter the Membership Type and click the "Add" button to create a membership category. If the category already exists, a validation message will appear while adding . Users can then select the existing Membership Category from the drop-down list.
Step 3:
Click the "Add" button to create a Membership Sub-Category. If the sub-category already exists, a validation message will appear while adding. Users can then select the existing Membership Sub-Category from the drop-down list.
Step 4 :
Enter the validity period for the Membership Type. Only numeric values are acceptable, and the value cannot be 0.
Then select the billing mode and the "Sales Bill" option should be set as the default in the user interface (UI).
- When the user checks the "Sales Bill" option, the system should enable the entry of billing items. Upon pressing Enter to select an item, an Item Selection box should pop up, displaying data sourced from the Item Master.
- If the user selects the "Receipt Voucher" option, a Prepaid Amount box should appear. The user can then manually enter an amount
- If the user selects the "None" option, the system should ensure that neither the billing item entry nor the prepaid amount field is visible.
Step 6 :
Check or Uncheck the Require Advance payment for appointment . - If the user does not check the "Require Advance Payment for Appointment" option, the system will not enforce any validation or requirement for advance payment when registering an appointment.
- If the user checks the "Require Advance Payment for Appointment" option, the system will ensure that advance payment is mandatory during the appointment registration process.