Meter Reading
User documentation
07/11/2025
Meter Reading
Requirement Overview
We're introducing a new feature for petrol pumps called the "Meter Reading" feature. It captures the amount of fuel dispensed by the pumps, digitally recording this measurement from the pump's meter within our system. This enables us to accurately track fuel consumption and maintain sales records in sync with the meter readings.
Database Changes
- EnablePetrolPumpFeatures =1 [Should show menus pump master, meter reading]
- EnablePetrolPumpFeatures = 0 [Should not show menus pump master, meter reading]
Limitation
- There's no functionality provided to delete the Meter End.
Functional Requirement
- Requirement 1 : Add Pump Master UI under >> Masters>>Masters.Clicking on "Pump Master" should open the Pump Master user interface.
- Search : It needs to search the entered data based on pumpwise .
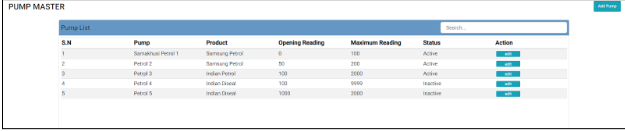
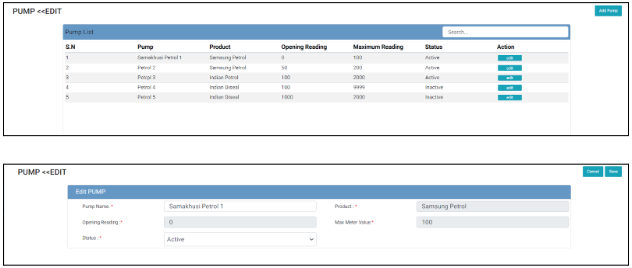
- Requirement 2 : Click "Add Pump" to create a new pump, which will open the Pump (Add) UI.In the "New Pump" form,
- Pump : The system must ensure that all names entered are unique, and it should not accept duplicate names.
- Product : Click Enter or PressingTab should trigger the automatic opening of a Product selection box.
- The Opening Reading field must only accept numeric data only and should accommodate up to 10 digits.
- The Max Meter Reading field must accept numeric data only and should accommodate up to 10 digits.It must be greater than Opening Reading if it is less than Opening Reading then a pop up message should be triggered.
- The status of a pump should be set to "active" automatically at the time of creation.
- After filling out the form and clicking "save," the newly created pump should appear in the Pump Lists.

- Requirement 3 : Within the Pump List feature, the "edit" button should enable users to modify pump details before it is utilized. If a pump is already being used for meter reading operations, users must be restricted from modifying the Product and Opening Meter Reading fields. However, they should be allowed to modify the name and status of the pump.
- When the user selects "Active" status for a pump, it must be displayed in the meter reading user interface. Conversely, if the user selects "Inactive" status for a pump, it must not be displayed in the meter reading user interface.
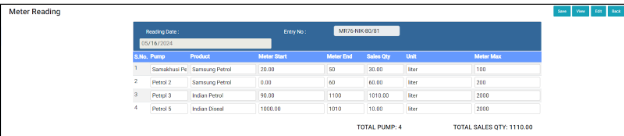
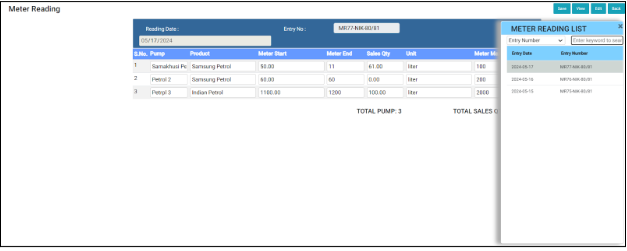
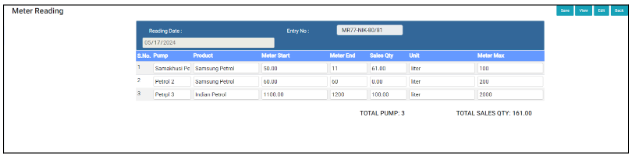
- Requirement 4 : Add Meter Reading UI under Others>>Transaction .Clicking on Meter Reading should open Meter Reading UI where the clients can add the Meter End.The created pump should be automatically filled in the close meter UI.Users should only be permitted to close the meter once per day, with visibility limited to active pumps. Inactive pumps should not be displayed in the Close Meter interface.
- Date: The date field within the system should be set as a default value. Users should not be able to select future dates. However, the selection of previous dates should be constrained by the date of the last entry made. This ensures that users can only choose dates up to the date of the last recorded entry, preventing invalid or out-of-sequence entries. In case a user selects an invalid date, a pop-up message should promptly appear displaying a specific error message”Please choose a valid date. Future dates or dates before the last meter closing date are not acceptable”.
- Entry No: The system should automatically generate a entry no in the format: MR Sequence Number - Division - Fiscal Year(MR1-MMX-80/81)
- Meter Start : It will come from the Pump Master Field as per the User Entered Data.
- Meter End : Users should manually enter the meter end value.But the meter end should not be greater than meter End so the sales Qty should not be shown in the negative form.
- If the meter end is lesser than Meter start then it will show a pop up message, it happened when max meter is exceeded of a pump and it form a cycle which will calculate the Sales Qty from this below formula.(Meter Max - Meter Start + Meter End )
- Sales Qty : The software should automatically calculate the Opening Meter Reading based on the Meter End value of the previous day or as per the Meter cycle.
- Meter Max should come from the pump master as per the User Entered Data.
- The Product and Unit information shall be sourced from the product master database, ensuring that only base units are utilized.
- If the Meter is not used for a day then User should include the meter end same as meter start to form 0 Sales Qty.
- Requirement 5 : After saving , the closing meter value at the end of the current day.It will serve as the opening meter value for the next day. Click on View in the Meter Reading should open Entries Selection Box where user can select the required entry no. where the clients can view it.
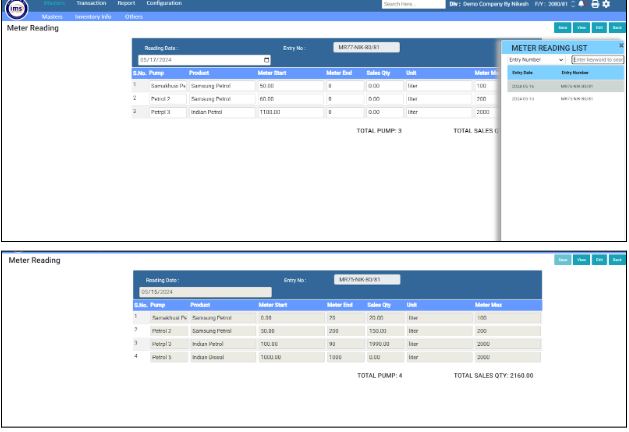
- Clicking "Edit" shall trigger the appearance of a selection box enabling users to choose entries.Validation should be implemented to ensure that only the latest MR entry is editable. MR entries preceding the last MR entry should not be editable.
- Requirement 6: Add Meter Reading report and dialogue for Meter as per UI design and Report Format . The report should be based on pumpwise.
- Date : - The saving date and time should be shown in the report format.
- As per Meter Reading : The meter reading sales should be as per meter reading.
- As per Sales : It should be based on Sales Tax Invoice as per product.
- Pending for Sales : It should be calculated based on As per Meter Reading and As per Sales.

UI Design
Report Format
https://docs.google.com/spreadsheets/d/1263vT5cmwSUkmqn_yyaQaF8EYAqxhtPsXcQvoxEsJSE/edit?usp=sharing
Application Flow
Step 1 : Create a pump in the pump master by filling out all fields in the New Pump form and clicking Save.Step 2 : Upon saving, the product stock should be accessible for sales, allowing the user to sell the product and save either the Sales Tax Invoice or Delivery Challan based on the customer.
Step 3 : At the end of the day, the user should enter the meter end in the meter reading and click on save. After clicking Save,
- Sales Quantity should be calculated as per Meter Start and Meter End
- If the meter max is exceeded then Meter End can be lesser than Meter Start where a Validation message will pop up and when user clicks on
- Ok : It will calculate the sales qty based on Meter Max - Meter Start + Meter End.
- Cancel : It will cancel the action and users have to enter the Meter End lesser tha Meter Max.
- The closing meter (Meter End) of the current day should be the opening meter (Meter Start) for the next day.
Step 4 : Then Go to the Meter reading report, choose the filter and click on Run. - Meter reading sales should correspond to the sales quantity in the meter reading, sales should match the billed sales quantity, and pending sales should align with calculated values of “as per meter reading “ and “as per sales”.
Note : In the event of a damaged pump, it's crucial to ensure that users can effectively replace it. Upon encountering a damaged pump, users should enter the same as Meter Start in the Meter End since the system doesn't accept null value at the meter end. If it take a lot of time then user can deactivate the pump in the pump master .
Definition of Done
- Meter readings are recorded individually for each pump.The user generates the pump master and enters the opening meter reading.and then perform sales transactions are conducted throughout the day.At the end of the day, the user inputs the closing meter reading for each pump once.Then the sold quantity and the pending sales should be matched with meter reading.