PAYMENT MODE
Technical documentation
08/08/2024
Requirement Overview
This feature is essential for configuring payment modes during sales transactions. It ensures that various payment options can be accurately set up and managed, while performing sales activities.
Database Changes
- The table paymentmodes Include the following columns :
PAYMENTMODENAME
SNO
MODE
ACID
SQLSTRING
OTPREQUIRED
PRINTRECIEPT
HIDEONNON TENDER UI
UI Design
Functional Requirement
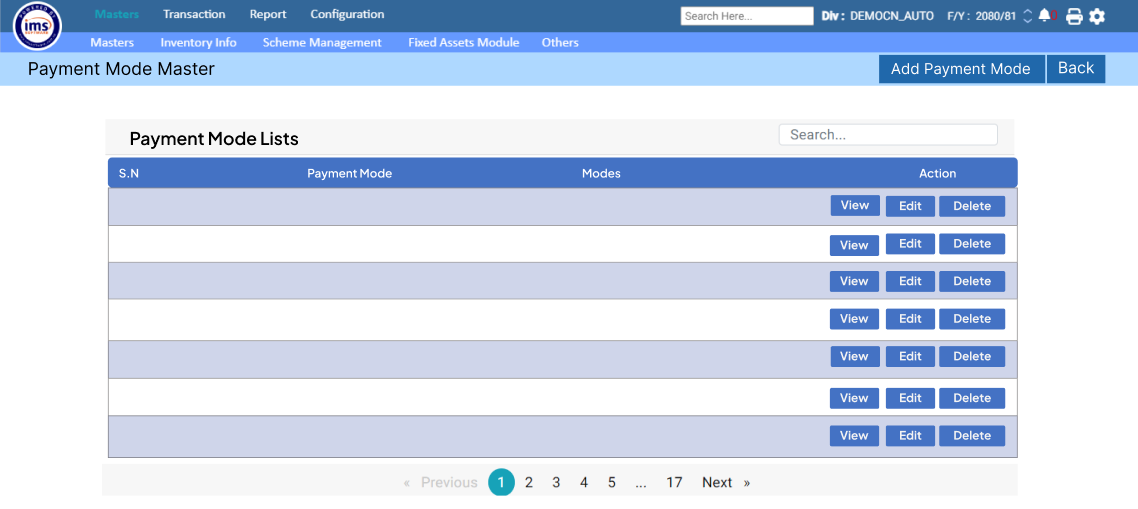
- Requirement 1 : When the user clicks on the "Payment Mode Master" option, the system shall create and display the following user interface (UI):
- All created payment modes should be displayed in the Payment Mode List. Users can view, edit, and delete payment modes as needed.

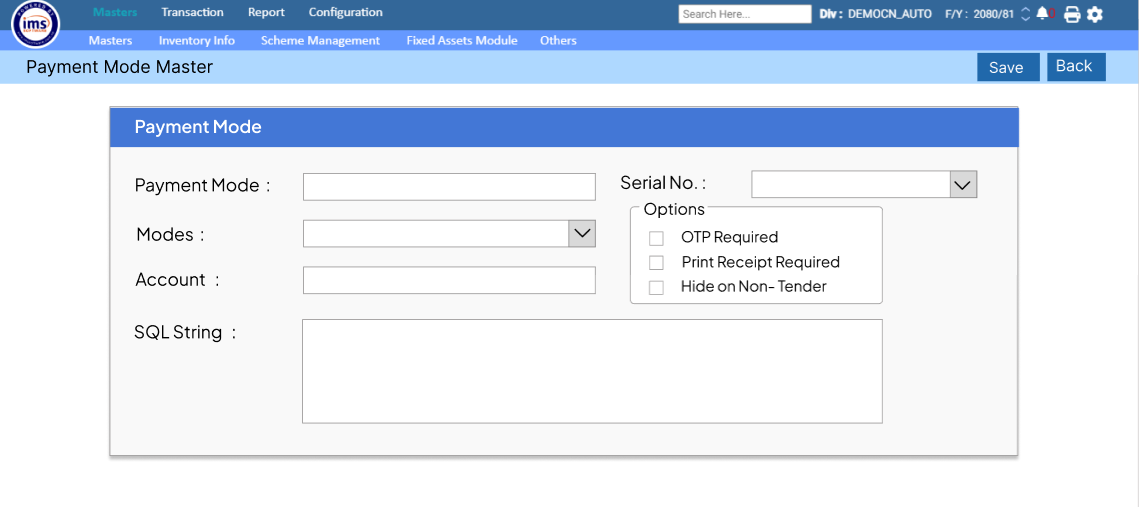
- Requirement 2 : When the user clicks on "Add Payment Mode," the following UI should be displayed with the following details:
- All fields are mandatory except for the Options field, which is optional.

- Payment Mode : Each entry should be unique, ensuring that duplication does not occur.
- Serial No. :The system should allow entries ranging from 1 to 100, and duplication of entries is permitted.In case of duplication , an alert message is required ”Duplicate Serial Number encounter, Proceed or not ? ”.
- Modes : The user can select a mode from a dropdown menu.There are four available modes.
- Credit : When the user clicks on "Credit," the Account field should be disabled, and the SQL String field should be enabled.
- Credit Card : When the user clicks on "Credit Card," the Account field should be disabled, and the SQL String field should be enabled.
- Others : When the user clicks on "Others," the Account field should be disabled, and the SQL String field should be enabled.
- Fixed A/c : When the user clicks on "Fixed A/c ," the Account field should be enabled, and the SQL String field should be disabled.
Note : There is another one payment mode named ‘E-Payment’ which will not display in this UI. This E-Payment mode is used only for dynamic QR payments which has separate UI in the application.

- Account : This field is enabled only when the user selects "Fixed A/c" as the mode.The user can select the fixed account from the Account Selection Box.
- SQL String : This field is enabled when the user selects any mode other than "Fixed A/c."
- Options : There are three check box :
- OTP Required : Check the box if OTP validation is required before applying the selected payment mode.
- Print Receipt Required : Check the box if the print receipt is required after saving the bill with specified payment mode..
- Hide on Non- Tender UI : Check if the user wants to hide the payment mode in Non Tender UI.
- Options : There are three check box :
- Requirement 3 : Clicking on Save :
- The data should be stored in the paymentmodes table.
- The saved payment mode should also be reflected in the bill tender UI and Non-Bill Tender UI during sales transactions.
Application Flow
- Step 1 : Navigate to Masters >> Masters and click on Payment Mode Master.
- Step 2: When the user clicks on Payment Mode Master, the Payment Mode List UI will be displayed, showing a list of all created payment modes.
- Step 3 : Click on Add Payment Mode to display the Payment Mode (Add) form, where the user can add a new payment mode.
- Step 4 : The user will enter the payment mode, and the system should ensure that duplication of payment modes is not accepted.
- Step 5 : Enter the serial no. from dropdown if exist otherwise enter the number from 1 to 100.
- Step 6: Select a mode from the dropdown. The behavior of the Account and SQL String fields should change according to the selected mode.
- Step 7 :The user must either select the Account or enter the SQL String, depending on the selected mode.
- Step 8 : Check "OTP Required" if the user needs an OTP for the transaction; otherwise, leave it unchecked.
- Step 9 : Check "Print Receipt Required" if the user needs a printed receipt; otherwise, leave it unchecked.
- Step 10 : Check "Hide on Non-Tender UI" if the user wants to hide the item in the non-bill tender UI otherwise leave it unchecked.
- Step 11 : Click on Save and it should be reflected while a sales transaction.